A Battery Issue That Turned Into a Plastic Nightmare
Éric WAHL
Full-Stack Developer & Designer
From Routine Maintenance to Plastic Engineering
Sometimes the best learning experiences come from the most unexpected problems. A relative came to me with a laptop that had a battery issue. No battery life at all. None. And while we were at it, I was also told that the laptop chassis was cracked because the hinge had become harder and harder to move. At the time, though, that still felt like a minor detail, right?
Spoiler alert: the battery ended up being the minor detail in this whole story...
The Setup: Replacing the Battery
So far, nothing looked especially complicated. I just needed to identify the exact laptop model and find a compatible replacement battery.
That part was easy enough, so I ordered the battery. While waiting for it to arrive, I opened the laptop to figure out what had caused the crack in the first place. That was when I realized how bad the chassis really was. The damage was already far too advanced. Every time the laptop was opened, another bit of plastic came loose, which was starting to seriously undermine the whole "portable" aspect of the machine...
The Problem Escalates: Repairing the Chassis
Once the battery had been replaced, which turned out to be the easy part, the real issue became impossible to ignore: the cracked chassis. I had to make a decision. The laptop was already on my operating table, and it was obvious the plastic would not hold up much longer. That was when, in a fine display of overconfidence, I decided to attempt a homemade chassis repair: cut out the cracked section and replace it with a 3D-printed part. After all, how hard could that be?
Did I mention I had been doing 3D modeling for, what, a month at that point? Bold move.
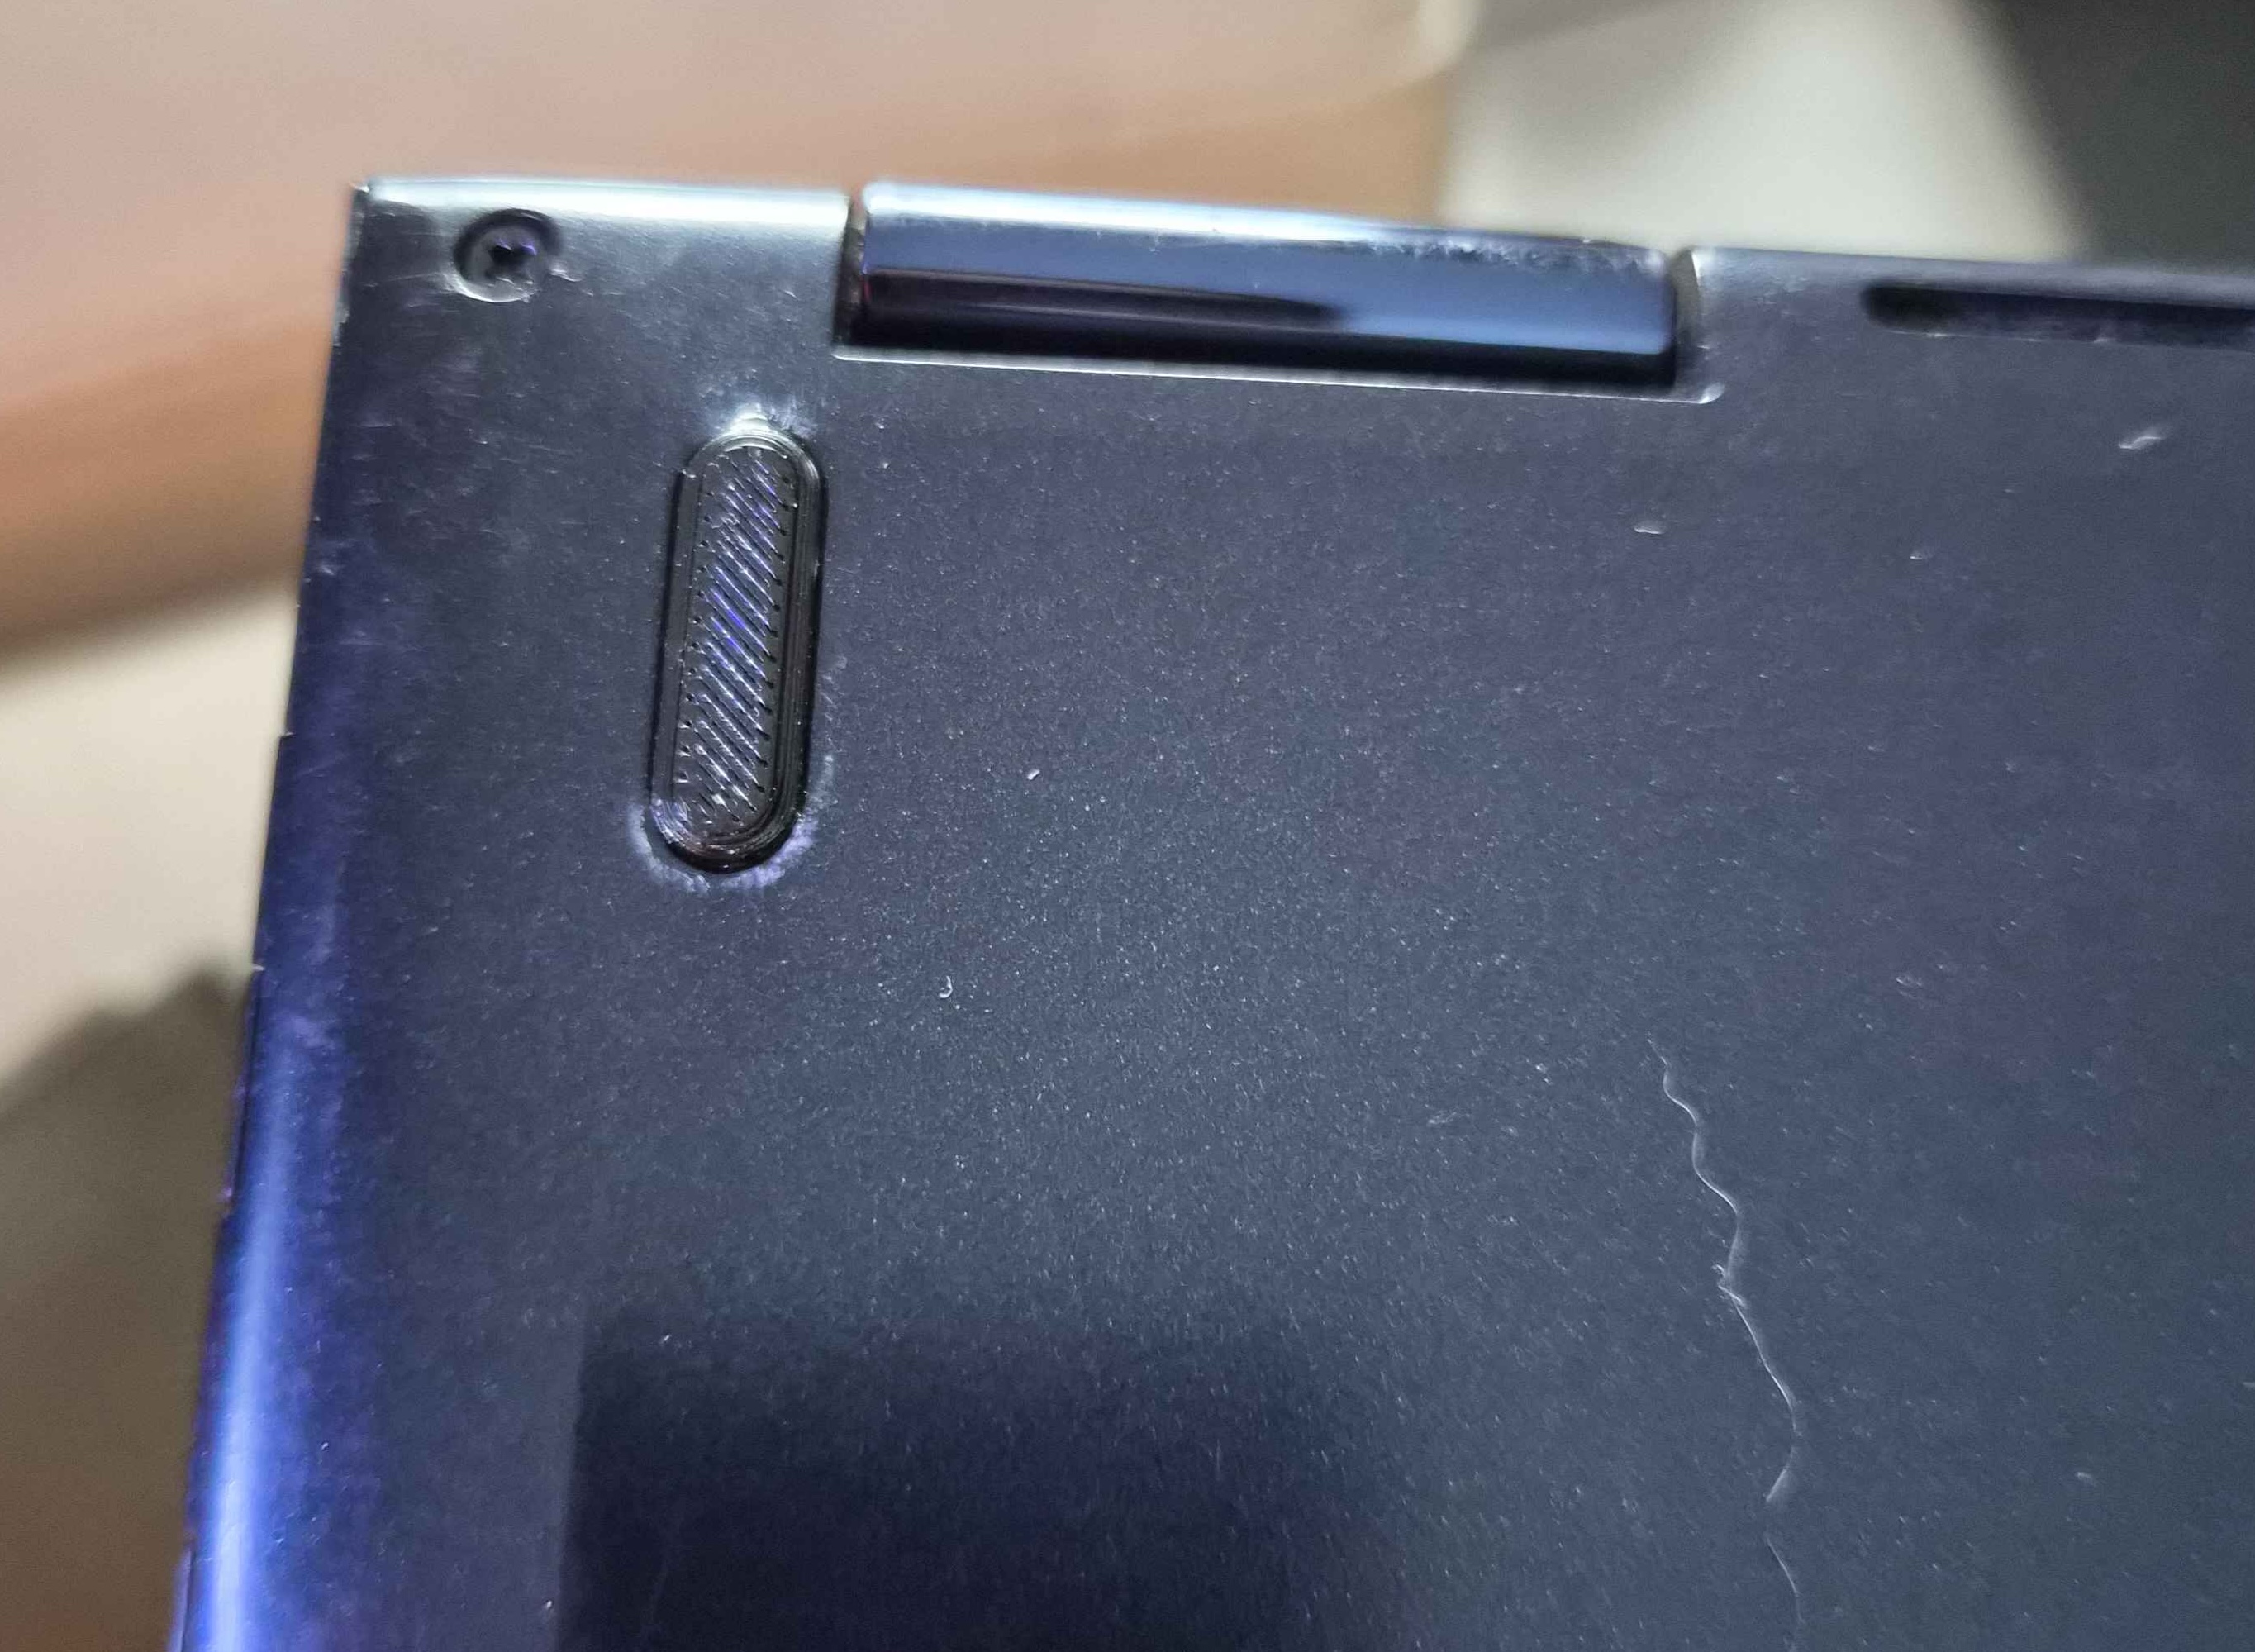
Taking a saw to a laptop feels deeply wrong, but I needed a clean cut if I wanted any chance of making a printed replacement part fit properly. And this was not some harmless cosmetic corner either. It was the section of the chassis holding the display hinge, the adjoining side of the frame, and a connector leading to a USB port. The screw inserts in the plastic were already damaged, and the crack was spreading. In short, I needed to move fast.
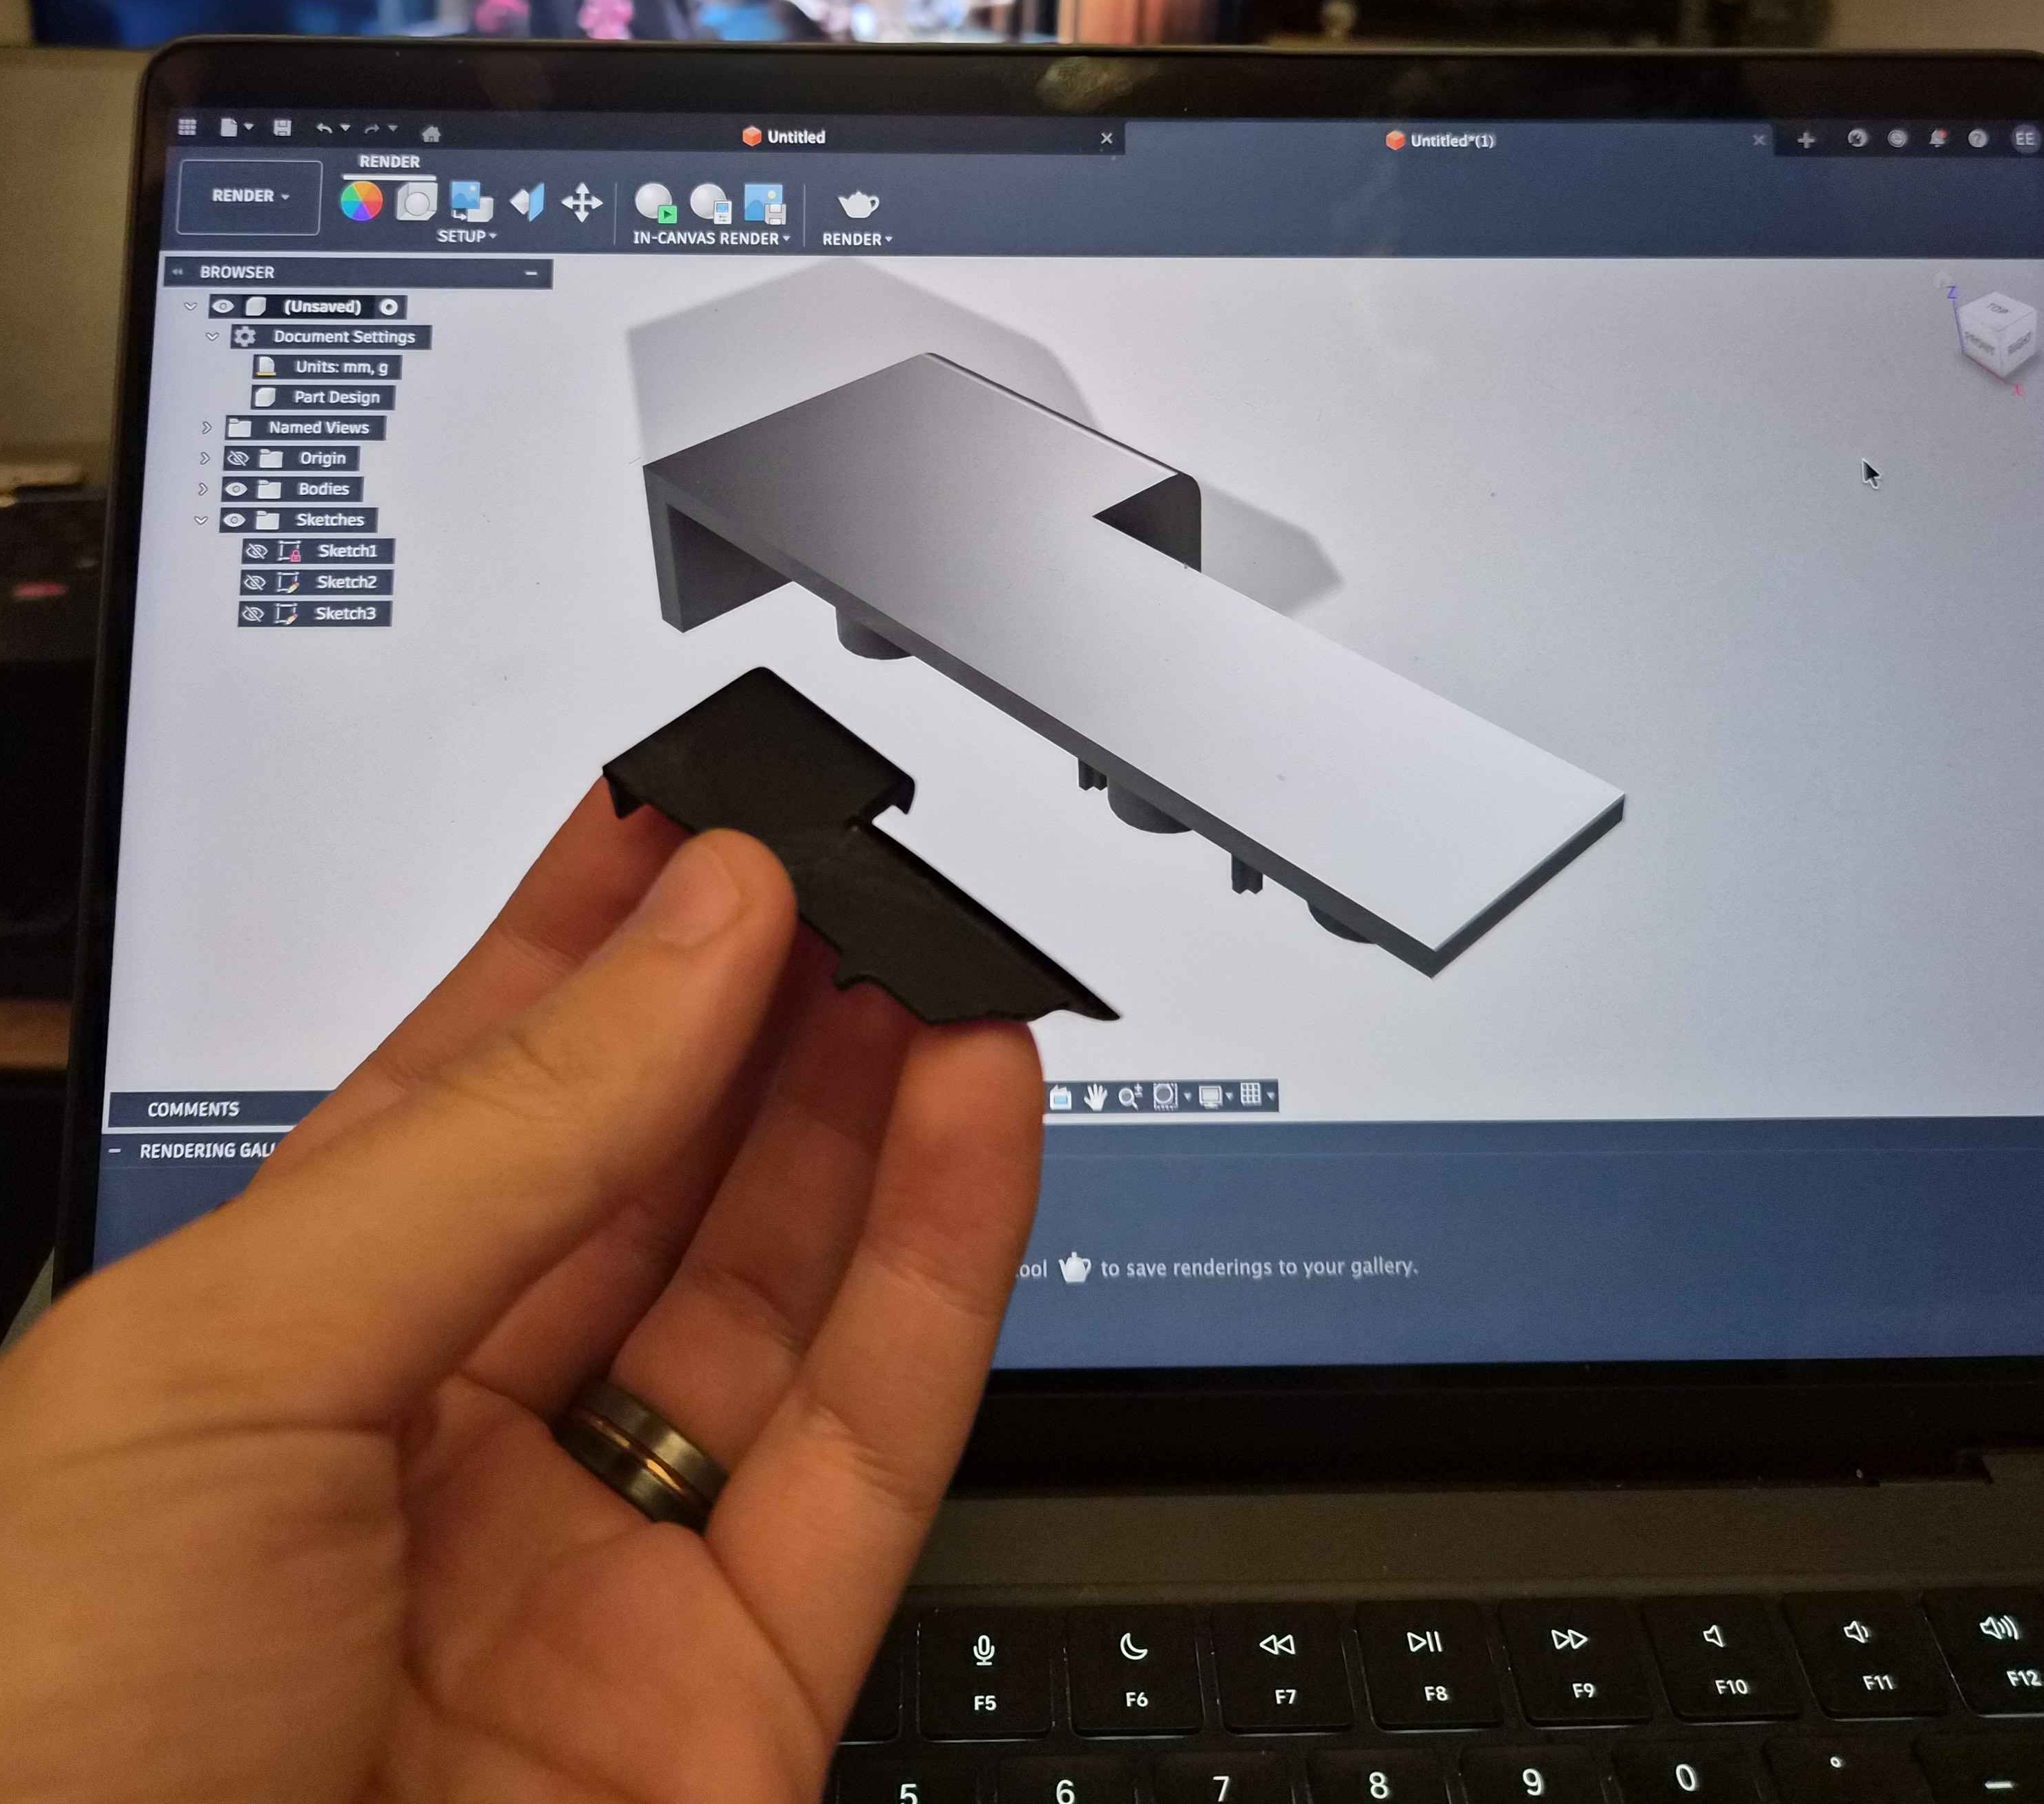
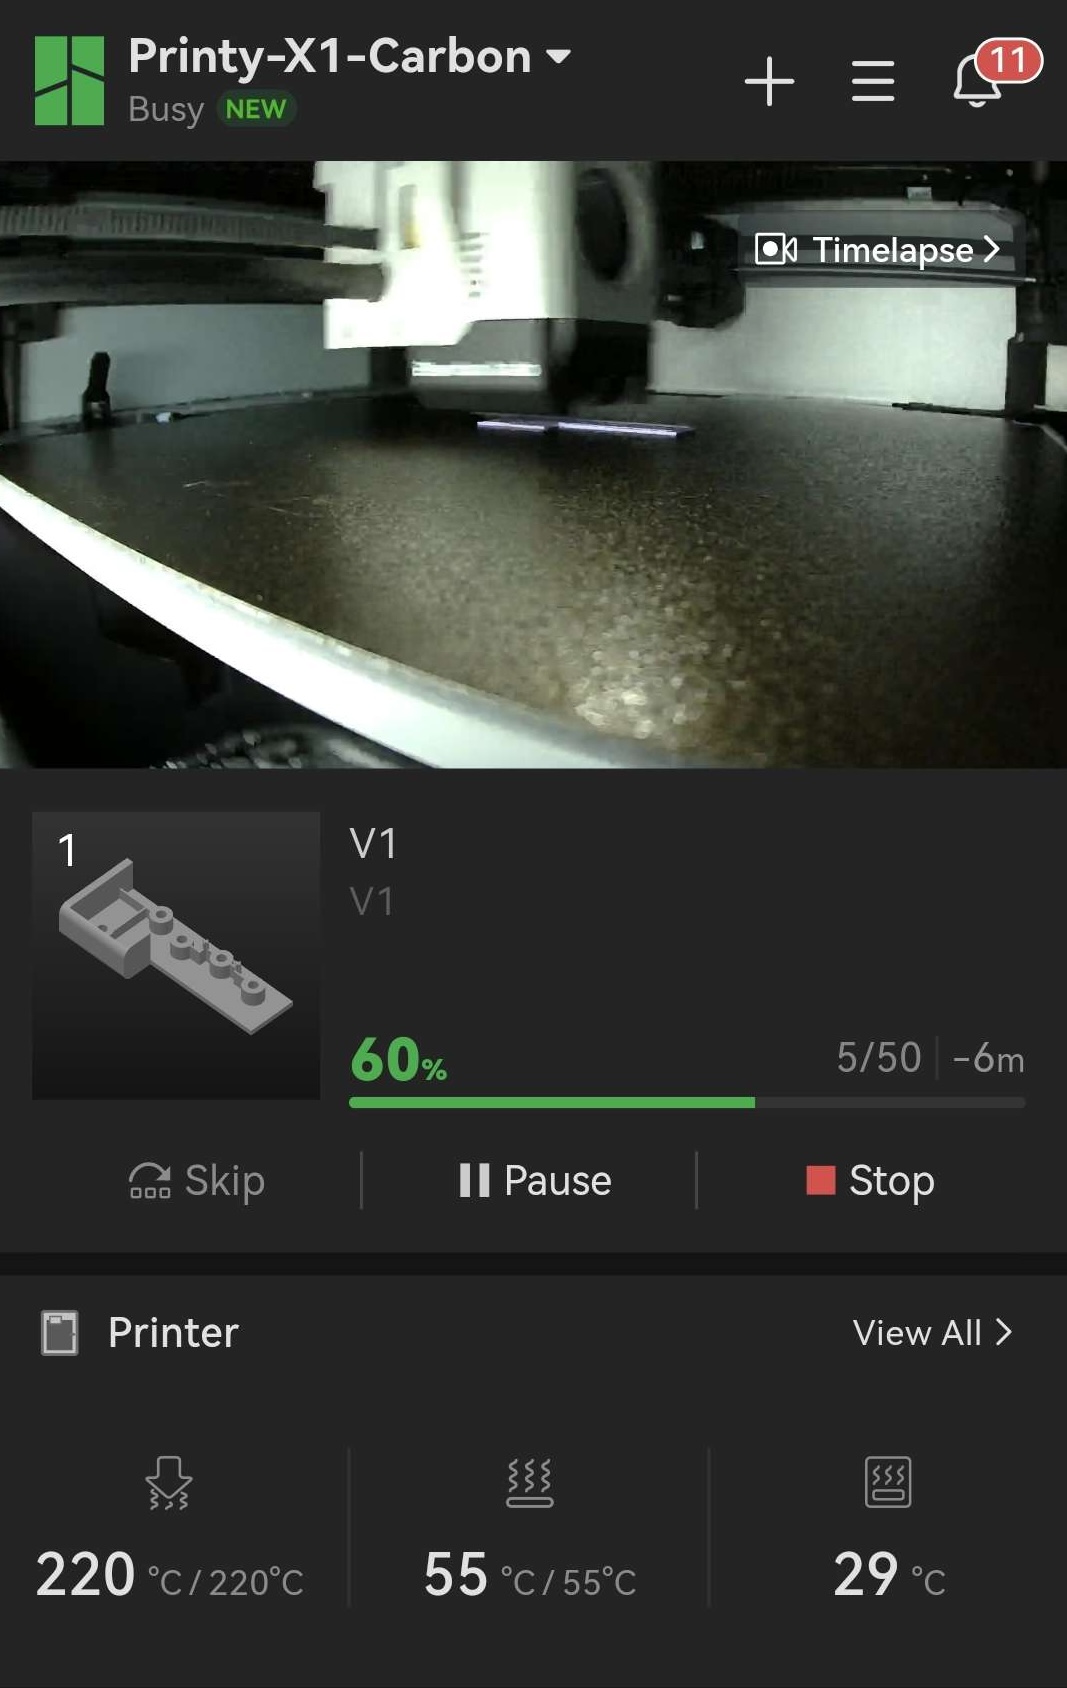
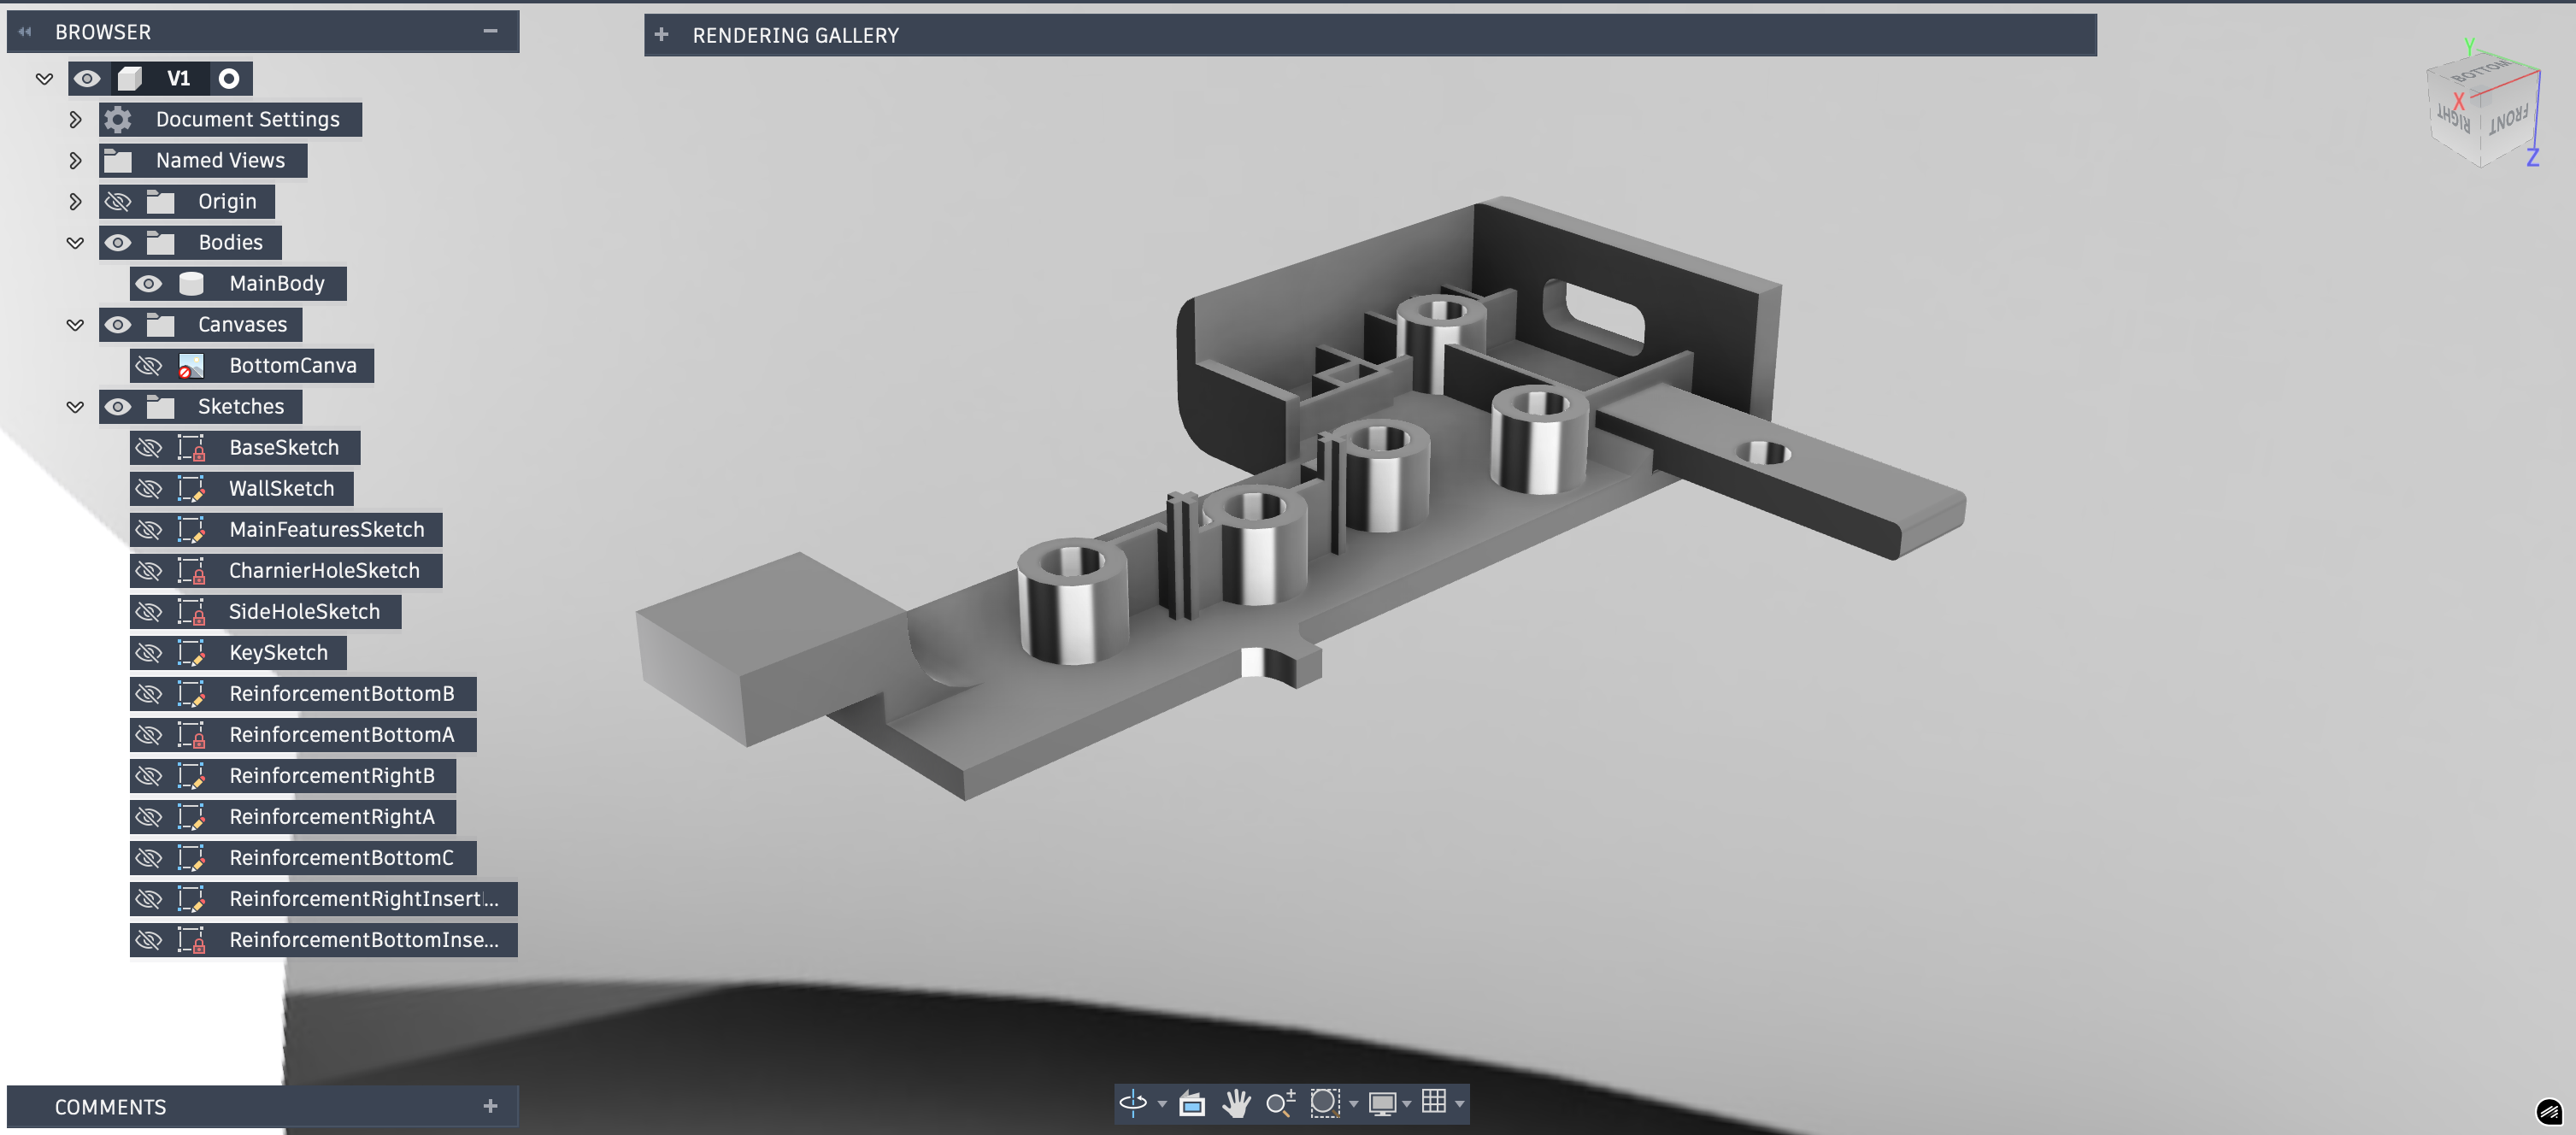
With the area prepared, I started taking measurements. Lots of measurements. There were really two parts to the job: first the main structure of the piece, then the hole placement for the threaded inserts. The first attempt was actually fairly promising. I knew from the start this would be an iterative process, so naturally I named the file "V1.stl". How many versions do you think it took before the part finally worked? From there, it was time to print. The base shape was fine; the main challenge was aligning the holes for the inserts. After V2 and then V3, the holes were at least roughly the right size and somewhere near the right location. It was too late to start a V4, so I left the patient on the operating table for the night.

The Next Day: Precision 3D Modeling
The next day, back to it: precise caliper measurements, V5, then V6... By the sixth iteration, the base was perfect and the holes were ready to take the chassis screws, but a new problem had emerged. It is nice to have a part that fits perfectly in its slot. The trouble is that once it is attached to the hinge, it is supposed to behave like an actual part of the chassis and withstand the forces coming from that hinge, not get dragged upward with the screen every time the laptop opens... That was the first real roadblock: how do you make the part truly integral to the chassis without it failing? I knew I was working with plastic, and plastic has limits, especially when thin parts are exposed to highly concentrated forces.
How Do You Make the New Part Structural?
On a platform this cramped, the options were limited from the start. V7 was my attempt to brace the new part against the rest of the chassis. But between the glue that failed and the very thin plastic that snapped on the first opening of the laptop, it became obvious that V7 was not the answer.
This was the point where I started regretting cutting into the chassis at all. Maybe I should have left everything alone and let the crack spread. At least then I would not have been dealing with the much harder problem of anchoring this replacement part...
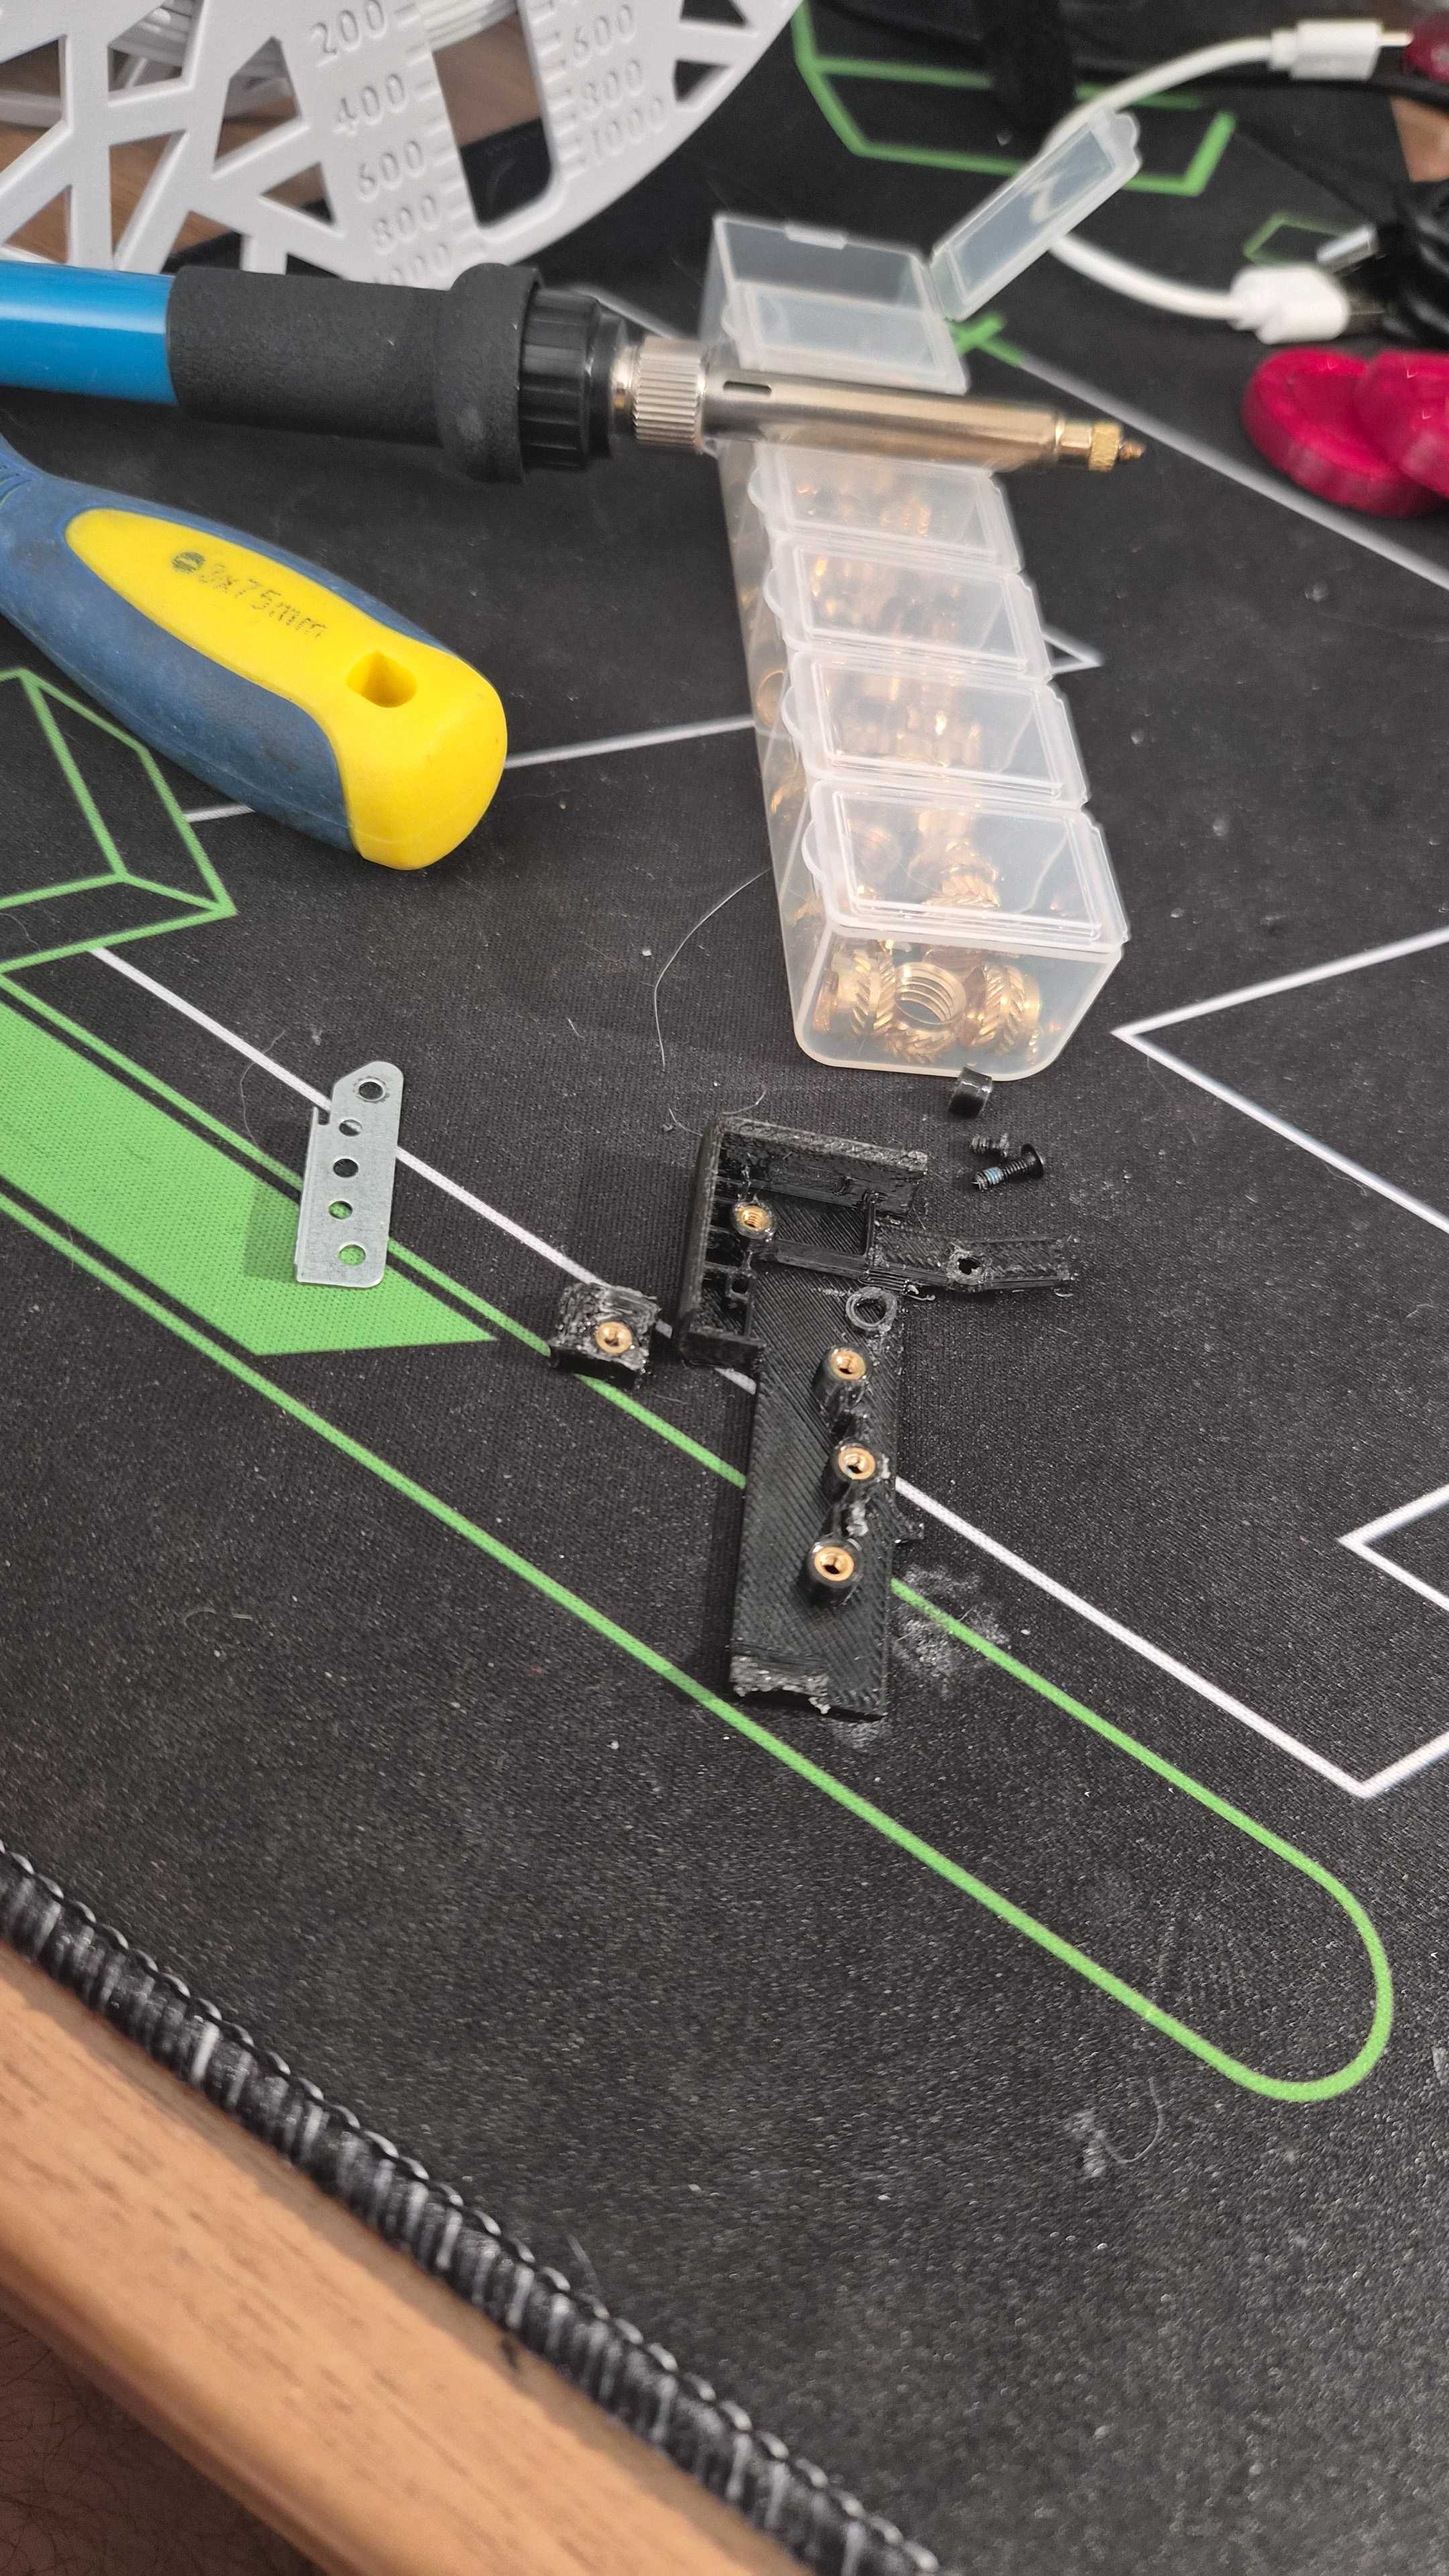
There was another issue too: I had already started using my metal inserts on prototypes for testing, even though I only had a limited number of them and could not afford to waste them on parts that were destined to fail. (The insert tool I had bought "just in case" and learned to use on the fly turned out to be absolutely essential for this project.)
Still, I had to keep going. I was too far in to back out, and I had already sunk too much time into designing this part to give up there. I needed a way to secure it properly to the chassis.
The Plan: Screws and Threaded Inserts
The next idea was to keep my existing support, but add an extension on the other end of the part with an extra hole for an insert. That meant drilling a new hole in the chassis, which was not exactly reassuring, but it offered the possibility of a stronger mount and a better distribution of forces.
After a V8 where the threaded hole ended up way too far from the hole I had drilled in the chassis, I made a V9 with the insert finally in the right place. But then I noticed another problem: the part was naturally being put under bending stress. That led to V10, with more distance between the two mounting points and a thicker body to better resist that flex. The supports were wider, the part was chunkier, and on paper it finally looked solid.
At least until I tried opening the laptop with all 7 inserts installed and the part fully mounted to the chassis...
Despair
The part snapped cleanly. Not in a "well, that almost worked" kind of way. Just an immediate, absolute failure.
Despair. At that point, I figured maybe one more screw would finally be enough to tie the whole thing together. So once again, another hole in the chassis, just as stressful as the last one, and then a V11 with one more insert.
And then... still no miracle.
Two holes in the chassis, the corner sawn off, 11 versions of the part, and still no viable solution. I was out of ideas. So I started digging through forums and repair threads, and eventually found out that this is a well-known flaw on these laptops: the hinge gradually gets stiffer while the plastic chassis gets more fragile. A vicious cycle that almost inevitably ends in cracks and breakage. The irony, of course, is that the laptop was originally sold for its 360-degree hinge, and it was becoming unusable because of that exact feature...
That was when one final approach occurred to me: attack the problem from the other side. Instead of trying to build the strongest possible "cast," maybe I needed to address the real root cause. The damage in the chassis was only a symptom of something deeper: a hinge that had become far too stiff and was transferring increasing stress into the plastic. So I started looking into how to access that hinge itself, which also carried the display cable. One wrong move, one bit of extra pressure in the wrong place, and that could easily mean a dead screen and a dead laptop. No pressure.
But at that stage, it was also the only way to keep this laptop actually portable.
Conclusion
After a lot of careful poking and prodding, I eventually managed to remove the cover and reach the hinge itself. It was almost seized up with rust and years of dust buildup. At that point, all I could really do was start loosening the hinge screws and hope for the best. And to my surprise, it started freeing up. Little by little, it became easier to move, until it finally felt much more normal, closer to the resistance you would expect from a regular laptop hinge.
With that huge constraint removed, I went back into my 3D modeling software and designed a V12. The holes were already there, so I might as well use them, and this time I had all the lessons from the previous versions on my side. For the first time, the part really had a proper chance of surviving.
A 20-minute print later, which somehow felt like an eternity, the part was ready to install.
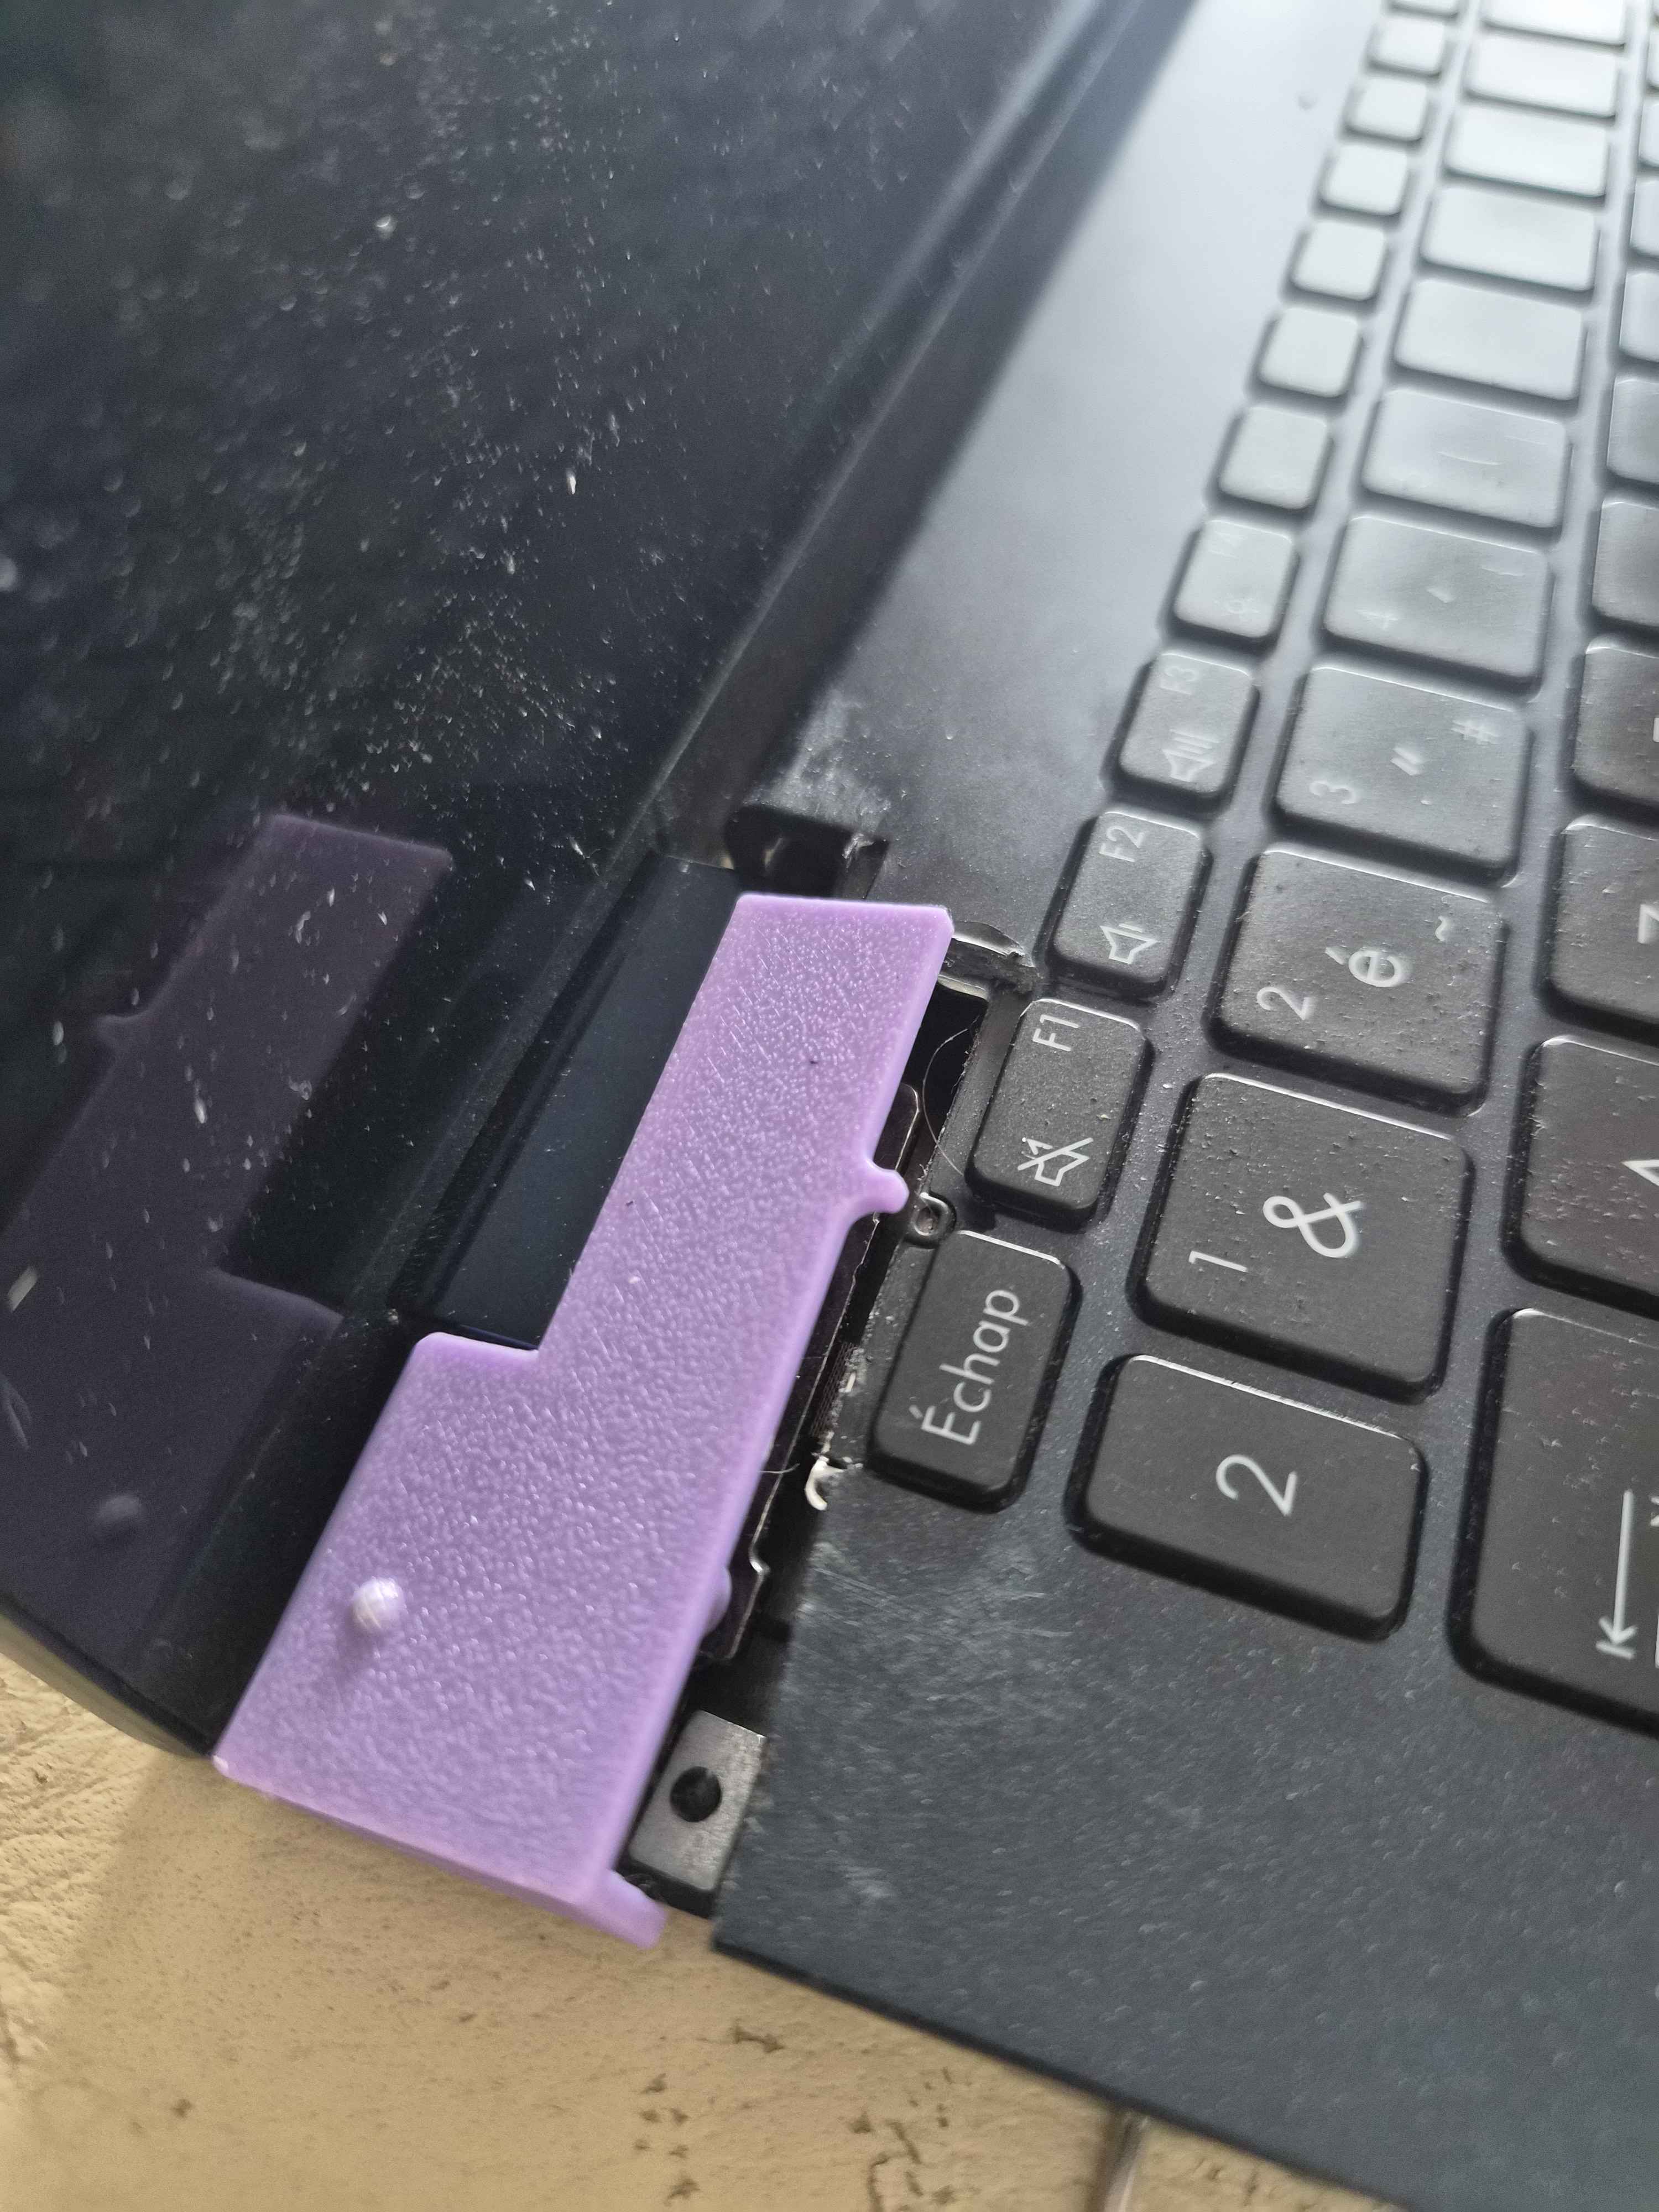
Every insert, every screw, every mounting point was in place. And this time, the part held without any weird stress, without bending, perfectly integrated into the chassis, doing exactly what a hinge support is supposed to do.
It worked.
After 12 versions, dozens of hours of modeling, measuring, printing, cutting, drilling, and failed mounting attempts, I had finally repaired something that had started to feel almost impossible to fix.
There was, of course, one final cut needed so the other side of the cover could close properly. But in the end, the laptop was functional again and, more importantly, portable again.
While the printer was still warm, I also took the opportunity to model and reprint the laptop's four silicone feet, all of which had peeled off and eventually fallen away. At that point, I figured I might as well give it back the ability to sit properly on a surface without sliding around.
With a fresh set of screws, a hinge that no longer threatened to tear the chassis apart every time it moved, and a laptop that had regained its portability, it felt like a complete win.
This project taught me a huge amount about 3D modeling, but even more about the patience and persistence required to see a repair like this through.
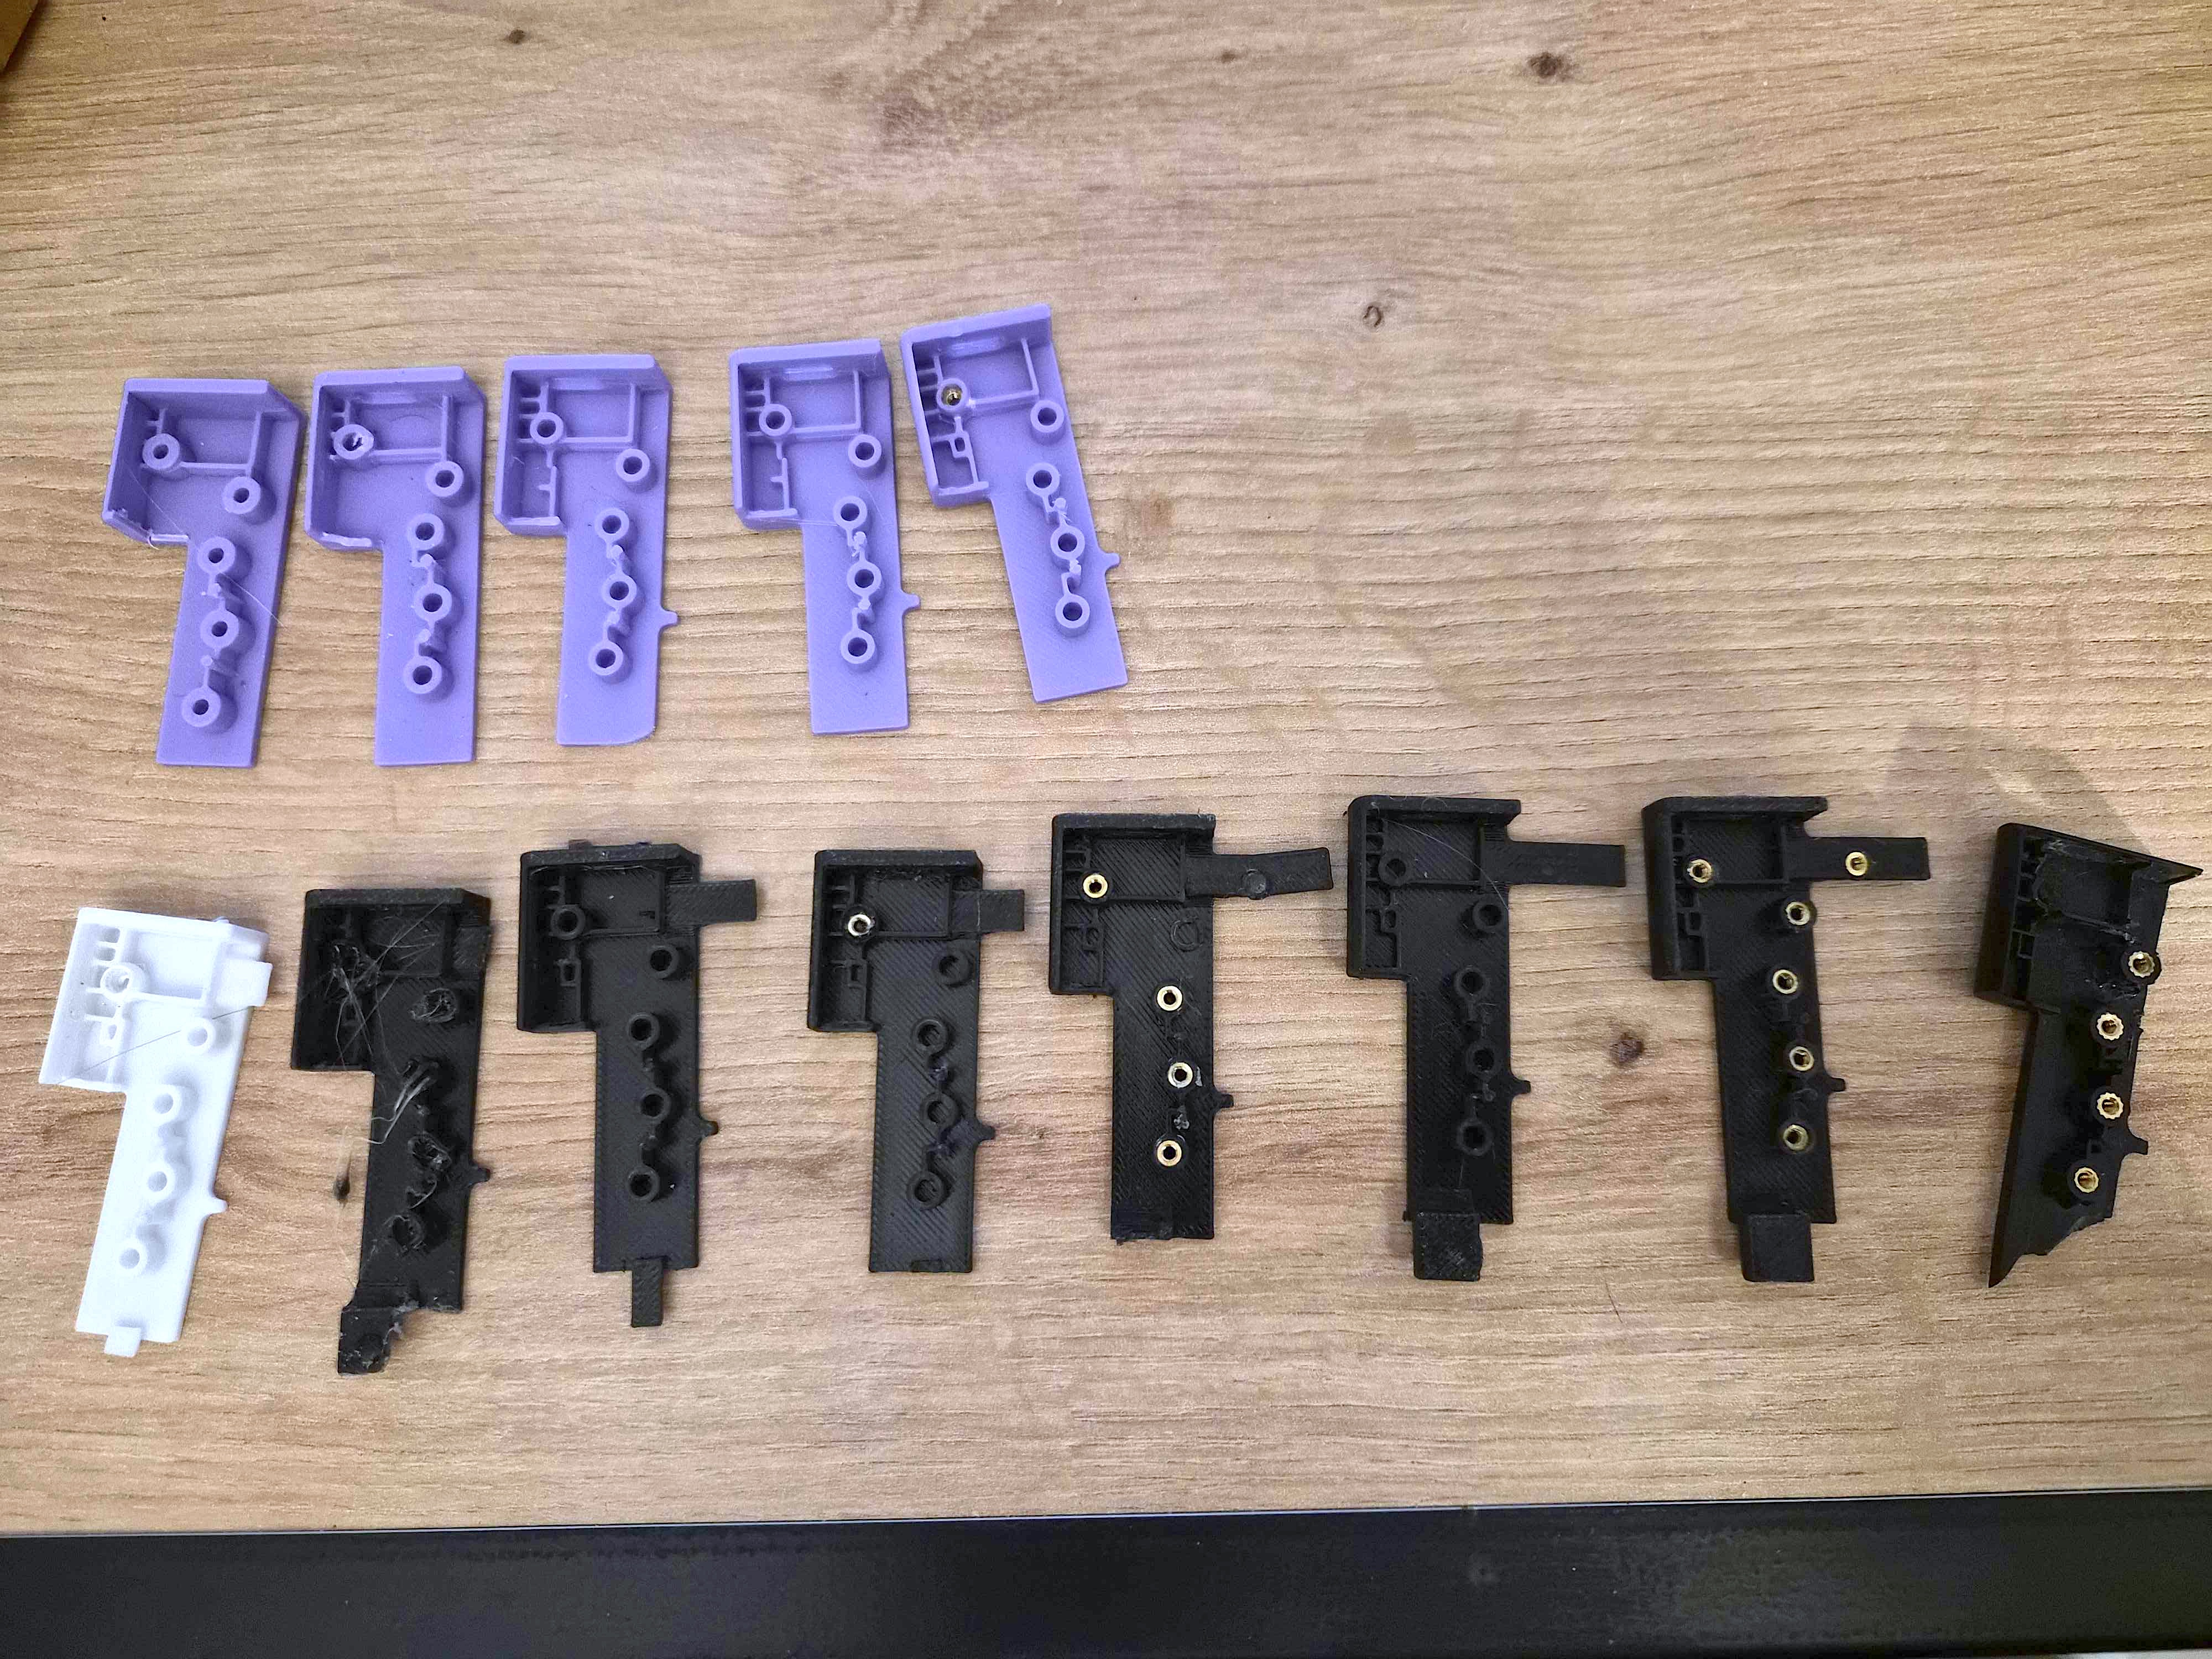
I also got to put iterative development into practice in a very literal way, learning from each failure, improving the part version after version, and eventually arriving at something that genuinely worked. There is something deeply satisfying about seeing a part evolve across so many iterations, then realizing how each little change ended up contributing to the final solution.
This whole ordeal probably would never have become such a project if I had tackled the hinge problem from the start. But sometimes you only find the right answer by taking the long way around, and that is often where the best lessons are hiding.
Have a similar project in mind? Feel free to reach out. I'd love to hear about your hardware adventures, or help troubleshoot if you're stuck in a situation like this.